In todays world, the desire to get back to basics is becoming more and more desirable. Our hope is that you will find some of the knowledge we share a benefit to you, to get closer to your dream of a healthier lifestyle, less dependent on assembly lined, processed, manufactured items.

Our goal is to help you find ways to use modern conveniences to allow you to live the life you want to live, and raise your family with the traditions that are important to you.

Grab a cup of coffee, or a glass of tea, and join us as we share our lives, our family and our knowledge with you.


Showing posts with label gardening. Show all posts

Saturday, April 16, 2016

Spring Gathering 2016

Plans are coming together for our 2016 Spring Gathering at our homestead on May 14th, 2016.  We are very excited to be able to offer educational sessions along with a time to share ideas and experiences with like-minded people.  We are planning to run sessions from 9 a.m. to 4:15 p.m.  We are hoping this will allow ample time for morning and evening chores and still give you time come and enjoy the day.

At this time we are scheduled to have 9 presenters who will be offering information on many topics: raising rabbits and goats, growing and using herbs, blacksmithing, wooden bowl making, natural gardening, butchering small animals, basic beekeeping and more!  Our day will be available at no charge to attendees.  Bring your lawn chairs and a picnic lunch and plan to spend the day with us.

You will be able to choose and attend 6 of the 12 sessions that will cover various topics.  The schedule for the day is outlined below.  Sessions followed by (*) will only be offered at that time, all others will be offered at two different times during the day.

9:00-10:00  Soap making--a simple soap made from common kitchen ingredients
                    Raising Goats Naturally--Raising and natural treatment for common problems
                   Growing Herbs*--Basics of herb gardening and common herbs that are easy to grow  

10:15-11:15 Basic Beekeeping--Understanding the miraculous honey bee
                     Raising Rabbits--Raising Rabbits and dealing with common issues        
                     Blacksmithing*--See and watch some new items made from common metal  

11:30-12:30 Natural Gardening--Growing produce with natural pest control and soil enhancement   
                    "Pellet Free" Rabbits--Feed your rabbits in ways that don't involve processed pellets
                    Dispatching Fowl*--process chicken, quail and perhaps and prepare for the freezer
 
12:45-1:45 Basic Beekeeping--Understanding the miraculous honey bee     
                   Raising Rabbits--Raising Rabbits and dealing with common issues
                   Dispatching Rabbits*--process rabbit and prepare it for the freezer 

2:00-3:00   Prepping Herbs*--Learn various ways to prepare, preserve and use common herbs
                   "Pellet Free" Rabbits--Feed your rabbits in ways that don't involve processed pellets
                   Natural Gardening--Growing produce with natural pest control and soil enhancement   

3:15-4:15  Soap making--a simple soap made from common kitchen ingredients
                  Raising Goats Naturally--Raising and natural treatment for common problems
                  Wooden Bowls*--Watch as Caleb works to turn a slab of wood into a shallow bowl   
                 
The sessions will be informal and questions will be encouraged.  You may choose at any point to skip a session, spread a blanket and have a picnic lunch, or you may eat lunch during one of the sessions. We have a large grassy area, and will have bottled water and drinks available.  Again, there is no charge for anything throughout the day and a box will be provided for donations to help offset costs, IF you choose to do so. 

One of the goals with our own homestead is to help others take their dreams to a realistic point.  You don't have to own a large acreage to provide healthy food for your family.  You can grow a garden anywhere; you can make soap and other projects in your kitchen; raising rabbits, chickens and even goats is possible in small areas; growing and using herbs will take your cooking to a whole new level, and many have medicinal uses as well; beekeepers are found even in large cities!  Some towns even allow small animal husbandry, with some restrictions.  Check the ordinances where you live.  You can preserve healthy foods by attending farmers markets, shopping produce sales at your local grocer, or trading your neighbors for their excess produce.  Nothing is impossible.  We hope to teach some basics and begin to offer resources of knowledge and networking to give you the motivation to start!  My point is that you can do this! No matter where you are in your life, there are ways you can provide better, safer, more enjoyable food and items for your family.

Papa and I were both raised on farms and it did not occur to us until recently that we have knowledge, and a wealth of family and friends with knowledge that should be shared.  Many people do not have access to this knowledge, so this is our way of beginning to share with others.

In addition to Papa and myself, we have had 7 others step up to help organize and put together this event.  With their help, we hope to make this a recurring event at least twice a year.  Look for the organizers, the day of the event, in their bright orange shirts.  Let them know how your day is going, and let them know what we can do to improve future Gatherings.  We already have several topics in the works for a Fall Gathering if you all would like.  Your feedback after the event will help us determine what sessions to plan for the Fall Gathering and will help us make improvements to best meet your needs.

Please, let us know of your intentions to attend, so that we can have plenty of drinks available, and plan for parking accordingly.  Visit  2016 Spring Gathering on FaceBook to reserve your spot, learn more about the presenters and find out additional information as it becomes available!  No FaceBook account?  Email me with 2016 Spring Gathering in the subject line!

We hope to provide you with a day of fun and knowledge, please come hang out with us.

Wednesday, April 6, 2016

Thinned Mint, Anyone?

The past week has been another roller coaster around the homestead. We've worked in the garden, planted in the greenhouse, begun work on re-doing pens in the barn for the animals, worked in the rapidly growing herb bed, marked our queens in both our bee hives and added supers for honey stores, and made a trip to the ER with our son.  All the while we have begun planning a 2016 Spring Gathering for local homesteaders/self-reliant persons/farmers etc.  We are excited about how well it is coming together and I will be doing some individual posts regarding the event, presenters and schedule for the day.

Yesterday, I worked in the greenhouse and herb garden.  I have always wanted mint....and now I have MINT....three kinds....fast growing....oh-my-goodness-mint!  The best advice I have for anyone growing mint is do not be afraid to pull up the runners and dispose of them!  Mint is prolific, some even say invasive!  My Homestead Mint is a very hardy variety and yesterday I thinned at least a bushel basket full.  I pulled it, roots and all, and know that I will be doing this regularly.  I planted it in a buried container initially, to help contain the roots, but it still sends out runners and likes where I put it enough to spread like wild fire.  I don't say all this to discourage anyone planting it, in fact just the opposite, I encourage everyone who wants any kind of herbs to grow mint.  Mint is an easy herb to grow and has many uses.  Success is almost assured, but you do need to be aware of its prolific nature when choosing the planting site and be prepared to spend a bit of time to keep it controlled.

In trying to keep the mint from taking over the other 10 or so herbs I have in one bed, I spent the day yesterday pulling the runners.  When I found myself with no less that a bushel of pulled mint, I began to think of what to do with it.  No way did I want to just burn it, or waste it.  I wasn't sure about feeding it to the rabbits or chickens, so I decided to make sure it was used for human consumption until I can confirm its safety for my animals.  I had always thought of harvesting herbs as a one time thing, much like corn or green beans.  You pick it, process it, and your are done.....with herbs though, you can harvest all season long.  Each type has it's ideal time, and depending on the intended use, you may choose to harvest certain times of the year for specific processes, but you can harvest it any time.  I'm not an herbalist, and am just learning much of the basics about herbs and their uses, so I won't give specifics that I may or may not be accurate about.  I encourage you to do some research.  It is fascinating.

After thinning out the herb bed and removing all the wondering Mint, I selected some nice healthy starts and potted them into cups, with large holes drilled for drainage.  I made sure to choose plants that had large root systems.  These will be offered for sale for $2 each as soon as I am certain the roots are strong and the plants are growing.  I will also be starting, sage, lemon balm, spearmint, peppermint, and others as time allows.

After potting,  I pinched each plant back  to encourage new, bushier growth.  Each place that was pinched back should send out 2 more shoots.  I used to avoid pinching back plants.  It just didn't seem right to pinch them back after they had worked so hard to grow. Now that I understand exactly how the plants grow, and how pinching back encourages healthy, bushy plants, I find it much easier to accept this part of the growing process.  The end results are much stronger, healthier plants that produce more.  I also saved all the leaves that got pinched off and added them to my extract, so nothing was wasted at all.

After pinching all the tops, making sure the starts got a good drink of water, the top leaves were saved for washing off and making my first start of mint extract.  I took the rest of the plants I had thinned into the Canning Kitchen.  I removed the roots and washed the stalks and leaves to remove any bugs or debris.  The stalks were then stripped of the leaves and discarded.  When I got enough to pack tightly into a quart jar, the leaves were packed tightly and covered with Vodka.  After making sure the leaves were all submerged below the surface of the liquid, and air bubbles were removed, the jar was tightly capped and was set in a dark cool place to set for several weeks.  Most people who do extracts recommend colored jars/bottles to avoid breakdown from the light.  I don't have a good selection of blue or brown glass jars or bottles, so I am using a cool dark corner on one of my canned good shelves for now.  Hopefully this will get me by until I can get some more appropriate jars.


I then set out to clean the rest of the mint.  Prep it for the dehydrator so that it could be dried for tea.  I dumped it in the sink, cut off all the roots, washed and rinsed it and laid it out on one of my drying screens to drain. 


These drying screens are invaluable to me.  I made them to store my sweet potatoes over the winter, but have many other uses in the canning kitchen.  I will be making more very soon.


There are couple different schools of thought on the drying process.  Some require stripping the leaves prior to drying, others allow the leaves to remain on the stems.  If you bundle the stems and let them air dry, the stems are necessary to tie to.  I chose to leave my leaves attached to the stems for the dehydrating process.  I will remove the leaves as I crumble them for tea.  This works best for me and they seem to be removed faster after they are dry than removing the leaves when they are green.  With my dehydrator, the mint will be completely dry overnight, even with the stems.  If you are drying in the air or sun-drying on a rack, it might be worth the effort to remove the leaves so that you are not retaining moisture in the stems.  When dry, the mint has a beautiful blue/green/brown appearance.  I will eventually mix my leaves with lemon balm, chamomile, and other herbs for various flavored teas.  I am excited to experiment with various flavors and see what I can brew!

I know my ancestors did not have the benefit of electric dehydrators and had to utilize the sun, air and other means of drying.  By being a Modern Missouri Pioneer and using my dehydrator I can do in a few hours what it used to take weeks to do.  This should allow me the time to experiment and come up with some tasty teas for both summer and winter.  Many of the herbs I am considering, have medicinal properties as well as wonderful flavor.  These teas, tinctures, extractions, decoctions and infusions can be used in combination to boost our health and treat illnesses, all naturally.  They can be used in making salves, lotions and soaps.  The possibilities are nearly endless.  I've only just begun to learn.

I'm sure my son, would love it if I could grow a plant or whip up a medicinal that could repair bone and replace teeth.  He had a mishap a couple of days ago.  While working on a ladder, he leaned one way, the ladder went the other and after the air conditioner effectively removed two of his front teeth on the way down, his right arm "broke" his fall, literally.  He will be laid up a while, recovering from both orthopedic and oral surgeries.  The lessons learned are many, not the least of which is remembering that that little sticker on the top of a ladder that reads, "NOT A STEP" it is really important to pay attention to. 

Everyone be safe when working outdoors in the Spring.  It only takes a moment to do things safely, and it may take weeks or months to heal up if you choose an unsafe method that you think is faster.  Sorry, Son, but you gave me a teachable moment....and you did photobomb my phone last week!  I love you!


Monday, March 14, 2016

Greenhouse Progress

The weather the last few weeks has been remarkably warm and spring-like.  While the weather is much enjoyed, it comes with some anxious anticipation.  The earlier Mother Natures brings on Spring-like weather the more worried I become that there will be that late frost that will snap, getting the peach and cherry blossoms among other blooming plants. 

Spring Fever is also harder to deal with as the Spring temperatures climb and the temptation to plant the garden gets strong, even though the mind knows that it is too early.  So until the weather is truly stable and warm enough to plant, we have been working on some projects and taking care of the babies that have arrived or been added.  We have never been known to quickly complete a project....and the greenhouse we started a year ago, had been placed out of the way as the summer got busier last year.  We decided now was the time to get it closer to reality.

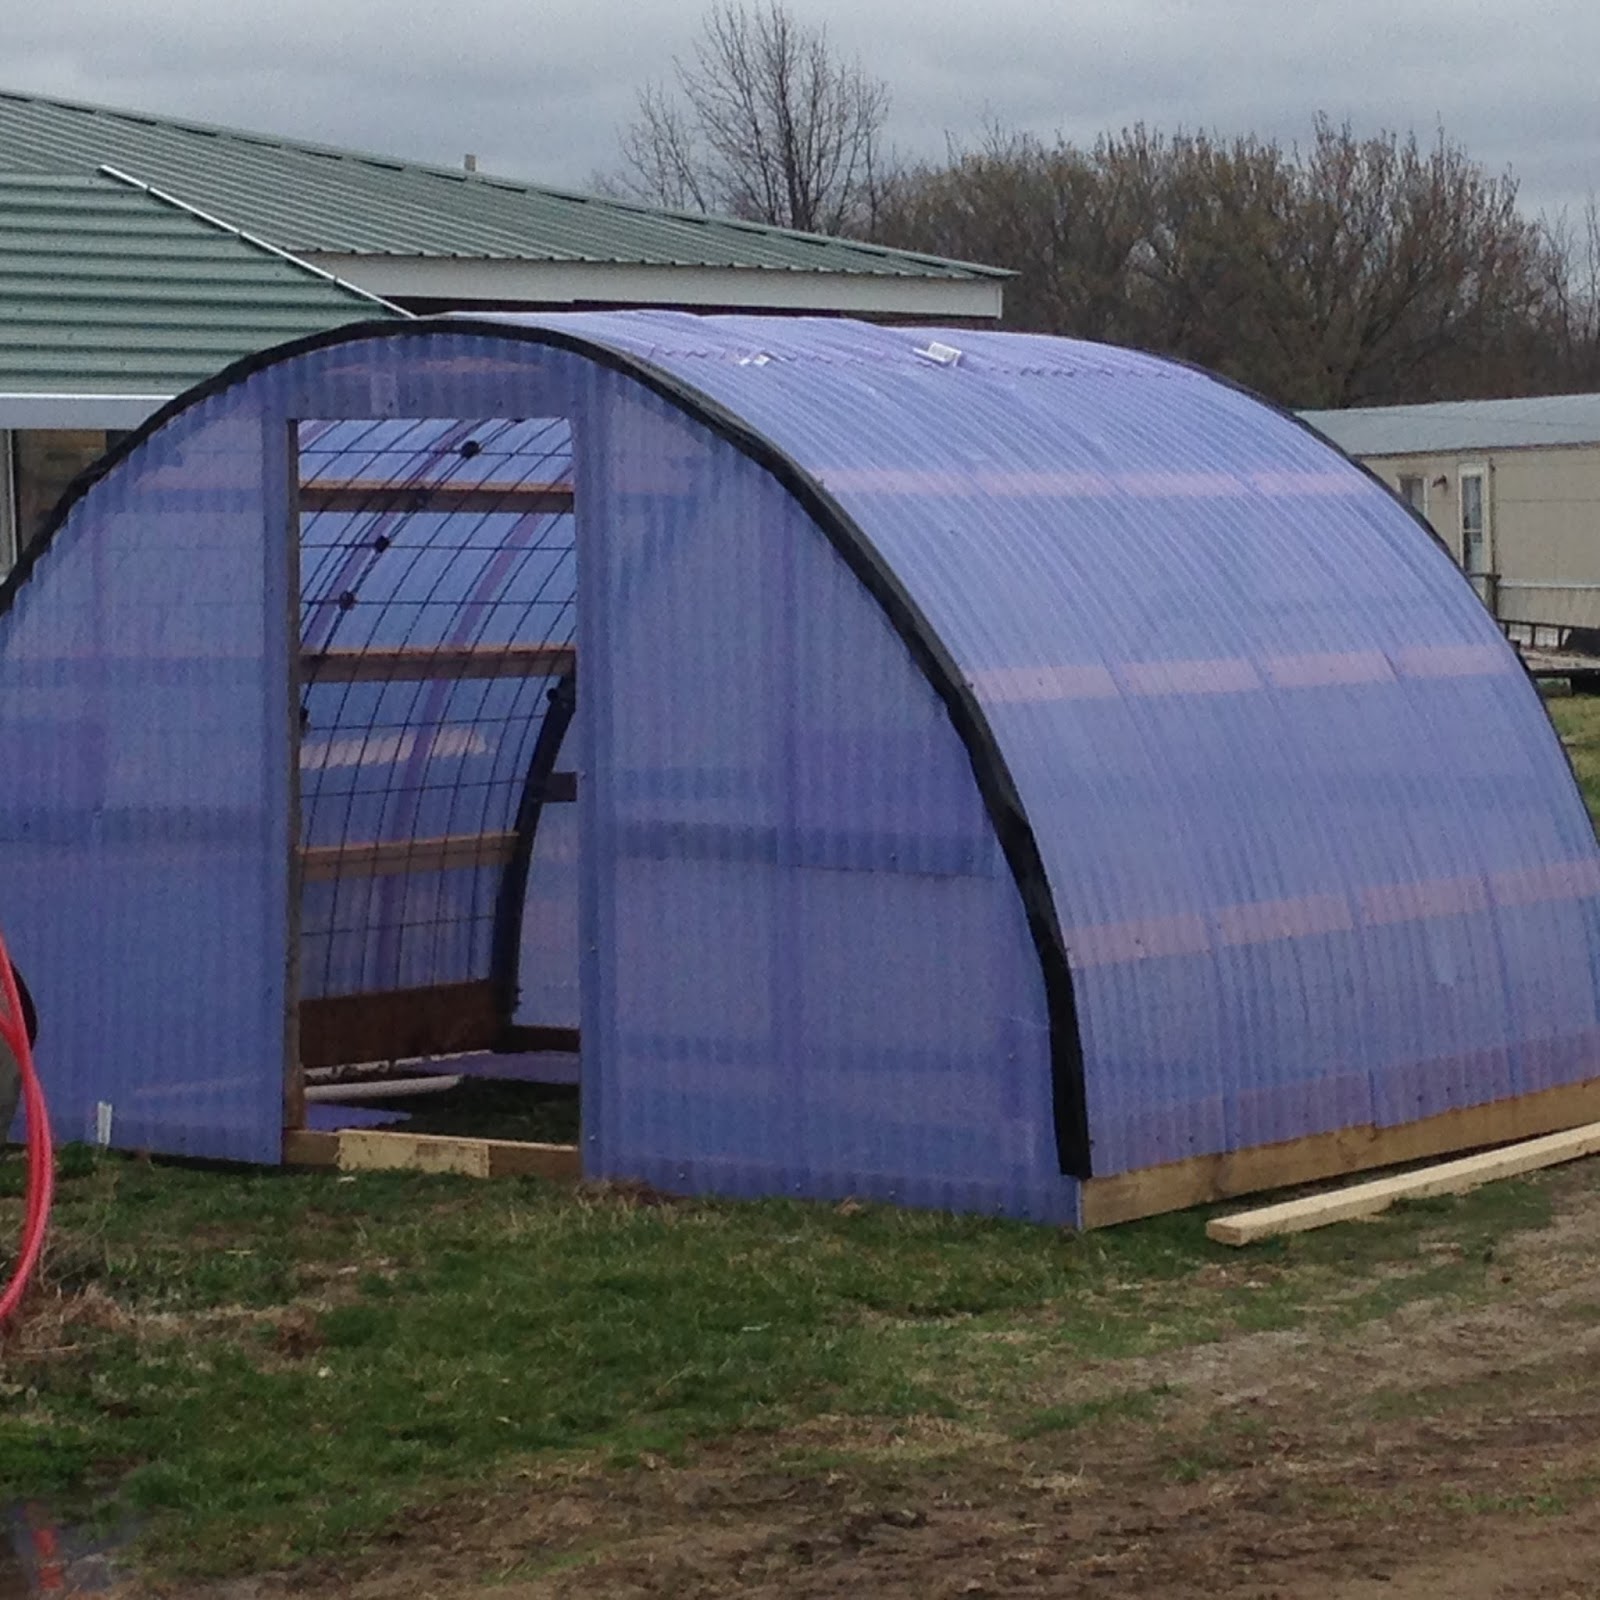
I am hoping to get the door on in time to start some plants for the garden, but if not, at least we are getting closer to being able to grow greens for salad all year long, by getting the green house closer to finished.  We opted to go for a corrugated PVC covering rather than plastic, for durability and longevity. 

We moved the frame to the location selected.  It is not far from the back door, close to a water hydrant and in full sun the bulk of the day. 

We began by attempting to attach the PVC sheeting horizontally.  We quickly realized that this plan would not work well, as there would not be enough tension to prevent them from being loose.  This would allow the wind to create movement that would eventually cause damage.


We removed the PVC pipes and drilled and screwed two by fours to the frames, evenly spaced to allow for adequate securing the corrugated PVC to the frame.  The corrugated sheets were then attached to the 2 x 4's with washered tin screws.  Papa and JD surprised me when I was at work one day and put the sheeting on, so I don't have pictures of that process.


Here is a nearly finished front.  We need to build and attach the door.  We also need to cut a window in the back that can be opened out for ventilation and to control the temperature in the summer time.  In addition to that, we will be making the raised beds and a table for starting seeds.  Hopefully this will be completed in the next couple of weeks.  We may not have time to get our own cool weather plants started, but we may still have time to start tomatoes, cucumbers, peppers, etc.  We are looking forward to putting this project to good use.  We have invested a bit more than we initially expected, but it should give us years of productivity, and spread over the last two years, the $400 we have invested has not hurt the budget too badly. 

 The learning process we will have will be enjoyable and at times frustrating.  I have recently learned that for each layer, we can gain a zone.  With that said, being in zone 6 (b), by having the greenhouse, we jump to zone 7.  If we add a hoop and plastic over the raised bed, it will increase to zone 8.  This idea becomes intriguing and I will be experimenting with a layer or two of plastic inside the greenhouse as we get further experience.  Until then, I am excited to be able to do more of our growing and seed starting without being dependent on purchasing them from franchise stores or local commercial greenhouses. 

Sunday, June 28, 2015

No Till Gardening

We have used several gardening methods in the past and this year we decided to go back to the one technique that proved to be the easiest to care for and appears to have provided the absolutely best harvests we ever had.  Two years ago we used a mulching technique that kept weeds at bay and then provided the best garden spot we ever had last year. We planted corn in that area and canned 110 pints, froze 20 dozen ears and gave away corn to several friends and family. Unfortunately we did not continue with the mulch, so we are doing quite a bit of work this year to catch up.  After this year, we should be set for the easiest and best gardening ever.  There should never be a need to plow or till the garden again, watering should be minimal, and weed control should be easy to maintain.  We have read the book "Lasagna Gardening" by Patricia Lanza and watched the video about Back to Eden Gardening which explains the gardening technique developed by Paul Gautschi.  I don't know that we are specifically following either exactly but using some parts of each.

This is what the area looked like in early spring. We planted in half barrels last year and decided that this technique is not for us. The watering requirements did not fit our schedules and we still had weeding that required much bending over. Considering that, we decided that going with mulching was best for us.  Many people are happy with barrels and other raised bed options. Isn't it wonderful that there are so many ways to provide for our families so that each of us can utilizes what works best for own families.


The beginning of prepping for this year, involved weeding out the barrels, raking out any roots missed by pulling the weeds. The composted soil is now ready to be layered into the garden.

We gathered mulch and additional compost and had piles ready near the garden site.  The mulch was free from the city close to where we live. It is from the chipping of brush that is cleared from the roadways each year. After the first year of decomposition, it is safe for our garden and in years after that it breaks down into nice black dirt that the worms love and the plants thrive in.

The compost is free from friends near us who own horses. They pile the manure outside each time they clean out the stalls in their barn. We try to get it after it has decomposed for a couple of years. It is great compost to add natural nutrients to the garden.

The last item to get together before the actual work begins, is a collection of paper feed sacks, cardboard, cardboard boxes, newspaper, etc. These are all free and friends are usually more than willing to give their "trash" to you and  are layered on top of the ground.  These work as the initial weed barrier to prevent the grass and weeds from coming up into the new compost/mulch layers. I will explain the wooden trough you see in the above picture in a bit.


Due to the weight of the barrels full of dirt, we found that dragging them into position with our UTV was the easiest for Papa and me.  The feed sacks were held in place with a few rocks until the weight of the compost could hold them in place. When you live on top of a hill, you get to enjoy a breeze all the time, but you also have to contend with things moving in that breeze so something to hold down the edges saves a lot of frustration and maybe even some ugly words!

This what the deep layer of compost looked like before any mulch was added. Let's take a look at the mystery trough on the right side of the garden area.


Papa built this box as a trial this year to plant some onions in. It was secured on top of the feed sacks and filled with compost. This will give the onions several extra inches of compost and will hopefully result in larger onions for the winter.

If there were any question of how fertile and healthy this compost/soil is, I think the size of this worm settles any question at all! 

Finally, a deep layer of mulch is added. It is hard to see in the picture just how deep this all is, but it is well above the head of the rake which is several inches tall.

This is what the rows of cool season plants looked like when first planted in the original area.  

Another friend brought some of these wooden pieces to me. They are bottomless, and hinged. The store nice and flat and don't require all the extra water that our old barrels did. I'm trialing potatoes, beets and carrots in them.  I'll update soon when we see how these vegetables are growing in them.

As long as we stay up on adding layers of mulch, we will not have to go through all this extra work again, and the weeds are few and far between. The weeds that do find their way into the garden are easily pulled and tossed.  The last layer of the process is one I didn't get pictures of. I added a layer of rabbit manure from under our rabbit pens.  This give the plants a nice compost tea drink everytime it rains or we have to water.  This process of the deep layer of mulching keeps the ground from drying out.  We have been blessed with rainfall so far this year, at times even more than needed.  One additional advantage is that the ground does not get muddy or soggy.  It might be a little spongy, but I can walk into my garden after a 6" rain with no fear of leaving footprints or even tracking mud into the house. 

This technique uses free and natural materials.  We did use our UTV to drag barrels and Papa used the tractor to move compost and mulch. The benefit of being a Modern Missouri Pioneer with this is that it saved some manual labor, aching backs and potential blisters. However, nothing about this technique relies on modern conveniences and could easily be done off grid with just a little extra labor.

  
Since the "big" garden area has been composted and mulched in years past, we decided to just till the weeds under and put on a thick layer of mulch to prepare it for the coming season. We will plant our corn, squash and pumpkins in this area this year and maybe change it up next year.  So far the weeding has been minimal and the corn and squash are growing great.  I need to take some more pictures and show some progress shots.  We planted our corn in intervals this year.  We planted five rows, waited two weeks, planted 5 more rows, waited 2 more weeks and planted 5 more. The plan is that we will not have all the corn ready to pick and process at one time.  So far, all of it looks good, except the last 5 rows. The germination of these seems to be inconsistent, and while it seems to be coming up well at this point, the germination has been very spread out.
The following pictures are some shots I snapped a few weeks ago in the garden. I'll take some more this week and do some current shots. 


Happy gardening! Hopefully each of you is having great success. The weather has been more cooperative than usual in SouthWest Missouri this year. :-)