In todays world, the desire to get back to basics is becoming more and more desirable. Our hope is that you will find some of the knowledge we share a benefit to you, to get closer to your dream of a healthier lifestyle, less dependent on assembly lined, processed, manufactured items.

Our goal is to help you find ways to use modern conveniences to allow you to live the life you want to live, and raise your family with the traditions that are important to you.

Grab a cup of coffee, or a glass of tea, and join us as we share our lives, our family and our knowledge with you.


Showing posts with label DIY. Show all posts

Saturday, May 7, 2016

More of our Presenters...

With the 2016 Spring Gathering a week from today, I guess I better get some more introductions made.  Not everyone has had time to get me their detailed information, so I will include what I know about them.

 
Jasmine will be presenting information on Growing, Preserving and Using Herbs.  Jasmine and her husband are looking forward to the day when they leave the small town they live in for a home in the country.  Jasmine began learning about herbs and their uses at an early age, and her interest and knowledge has expanded over the years.  Her website, Thyme and Timber, is a wealth of information for both beginner and experienced herbalists.  You can also follow her on Facebook at her Thyme and Timber Facebook Page.


Lance has an variety of experience growing all types of plants.  According to Lance, "I have been doing some type of gardening my whole life."  Lance has run landscape crews, has been a nursery salesman for several years off and on.  He has worked with soil scientists and Horticulturists.  Lance feels that basically anyone can grow food with chemicals, but Lance prefers to test out different soil mixtures with different plants and keep things all natural.  Lance and his wife Cynthia live on a small acreage with their children and have been key in organizing and developing the Ash Grove Farmers Market.  You can also follow them on their Facebook page, Mossy Rock Farm.  Lance is planning a great presentation on natural soil amendments to get the most from your garden plants. 


Caleb is a remarkable young man who is self-taught in many areas of homesteading and primitive arts.  He is currently focusing on blacksmithing, from which he makes knives and other tools.  He also enjoys repurposing other metal objects, such as railroad spikes into usable items.  Caleb's latest endeavor is turning some of the slab wood, which is a byproduct at a local sawmill into gorgeous slab bowls.  Caleb was homeschooled by his remarkable mother, and his ability to research and work independently shines through in the skills of this young man.  As one of the older siblings in his large family, his younger siblings are guided by Caleb in many ways.  He is true pioneer in the interests he pursues. 
 
Tina, and her family raise calves,
goats, ducks, rabbits and other animals on their farm.   She will be teaching us how to raise our goats naturally.  For every problem, there are natural treatments, and Tina has extensive experience in that area.  She plans to share her knowledge in treating common illnesses without resorting to chemical and synthetic medications.  Tina will also be sharing the benefits of having goats on your farm/homestead.
Whitney is a stay-at-home mom to two wonderful little boys, and contributes to the family meals by offering butchering and processing of small animals on the shares.  It is a win-win situation for her customers who know she uses humane and sanitary methods, just as she does for her own family.  They get the delicate process of dispatching completed, and give her a share of the final meat for her family.  Whitney processes all types of small animals and plans to demonstrate the process with quail, chickens, rabbits and a turkey if one is available.
 
We hope you will join us for the day.  The presentations will begin at 9 and run until 4:15.  Our location is on our farm near Miller, Missouri.  You will need to bring lawn chairs, and a picnic lunch, if you would like.  Other items you might find useful will be a notepad and feel free to bring your camera.  More details are found here.  We look forward to visiting with you.

Wednesday, April 6, 2016

Thinned Mint, Anyone?

The past week has been another roller coaster around the homestead. We've worked in the garden, planted in the greenhouse, begun work on re-doing pens in the barn for the animals, worked in the rapidly growing herb bed, marked our queens in both our bee hives and added supers for honey stores, and made a trip to the ER with our son.  All the while we have begun planning a 2016 Spring Gathering for local homesteaders/self-reliant persons/farmers etc.  We are excited about how well it is coming together and I will be doing some individual posts regarding the event, presenters and schedule for the day.

Yesterday, I worked in the greenhouse and herb garden.  I have always wanted mint....and now I have MINT....three kinds....fast growing....oh-my-goodness-mint!  The best advice I have for anyone growing mint is do not be afraid to pull up the runners and dispose of them!  Mint is prolific, some even say invasive!  My Homestead Mint is a very hardy variety and yesterday I thinned at least a bushel basket full.  I pulled it, roots and all, and know that I will be doing this regularly.  I planted it in a buried container initially, to help contain the roots, but it still sends out runners and likes where I put it enough to spread like wild fire.  I don't say all this to discourage anyone planting it, in fact just the opposite, I encourage everyone who wants any kind of herbs to grow mint.  Mint is an easy herb to grow and has many uses.  Success is almost assured, but you do need to be aware of its prolific nature when choosing the planting site and be prepared to spend a bit of time to keep it controlled.

In trying to keep the mint from taking over the other 10 or so herbs I have in one bed, I spent the day yesterday pulling the runners.  When I found myself with no less that a bushel of pulled mint, I began to think of what to do with it.  No way did I want to just burn it, or waste it.  I wasn't sure about feeding it to the rabbits or chickens, so I decided to make sure it was used for human consumption until I can confirm its safety for my animals.  I had always thought of harvesting herbs as a one time thing, much like corn or green beans.  You pick it, process it, and your are done.....with herbs though, you can harvest all season long.  Each type has it's ideal time, and depending on the intended use, you may choose to harvest certain times of the year for specific processes, but you can harvest it any time.  I'm not an herbalist, and am just learning much of the basics about herbs and their uses, so I won't give specifics that I may or may not be accurate about.  I encourage you to do some research.  It is fascinating.

After thinning out the herb bed and removing all the wondering Mint, I selected some nice healthy starts and potted them into cups, with large holes drilled for drainage.  I made sure to choose plants that had large root systems.  These will be offered for sale for $2 each as soon as I am certain the roots are strong and the plants are growing.  I will also be starting, sage, lemon balm, spearmint, peppermint, and others as time allows.

After potting,  I pinched each plant back  to encourage new, bushier growth.  Each place that was pinched back should send out 2 more shoots.  I used to avoid pinching back plants.  It just didn't seem right to pinch them back after they had worked so hard to grow. Now that I understand exactly how the plants grow, and how pinching back encourages healthy, bushy plants, I find it much easier to accept this part of the growing process.  The end results are much stronger, healthier plants that produce more.  I also saved all the leaves that got pinched off and added them to my extract, so nothing was wasted at all.

After pinching all the tops, making sure the starts got a good drink of water, the top leaves were saved for washing off and making my first start of mint extract.  I took the rest of the plants I had thinned into the Canning Kitchen.  I removed the roots and washed the stalks and leaves to remove any bugs or debris.  The stalks were then stripped of the leaves and discarded.  When I got enough to pack tightly into a quart jar, the leaves were packed tightly and covered with Vodka.  After making sure the leaves were all submerged below the surface of the liquid, and air bubbles were removed, the jar was tightly capped and was set in a dark cool place to set for several weeks.  Most people who do extracts recommend colored jars/bottles to avoid breakdown from the light.  I don't have a good selection of blue or brown glass jars or bottles, so I am using a cool dark corner on one of my canned good shelves for now.  Hopefully this will get me by until I can get some more appropriate jars.


I then set out to clean the rest of the mint.  Prep it for the dehydrator so that it could be dried for tea.  I dumped it in the sink, cut off all the roots, washed and rinsed it and laid it out on one of my drying screens to drain. 


These drying screens are invaluable to me.  I made them to store my sweet potatoes over the winter, but have many other uses in the canning kitchen.  I will be making more very soon.


There are couple different schools of thought on the drying process.  Some require stripping the leaves prior to drying, others allow the leaves to remain on the stems.  If you bundle the stems and let them air dry, the stems are necessary to tie to.  I chose to leave my leaves attached to the stems for the dehydrating process.  I will remove the leaves as I crumble them for tea.  This works best for me and they seem to be removed faster after they are dry than removing the leaves when they are green.  With my dehydrator, the mint will be completely dry overnight, even with the stems.  If you are drying in the air or sun-drying on a rack, it might be worth the effort to remove the leaves so that you are not retaining moisture in the stems.  When dry, the mint has a beautiful blue/green/brown appearance.  I will eventually mix my leaves with lemon balm, chamomile, and other herbs for various flavored teas.  I am excited to experiment with various flavors and see what I can brew!

I know my ancestors did not have the benefit of electric dehydrators and had to utilize the sun, air and other means of drying.  By being a Modern Missouri Pioneer and using my dehydrator I can do in a few hours what it used to take weeks to do.  This should allow me the time to experiment and come up with some tasty teas for both summer and winter.  Many of the herbs I am considering, have medicinal properties as well as wonderful flavor.  These teas, tinctures, extractions, decoctions and infusions can be used in combination to boost our health and treat illnesses, all naturally.  They can be used in making salves, lotions and soaps.  The possibilities are nearly endless.  I've only just begun to learn.

I'm sure my son, would love it if I could grow a plant or whip up a medicinal that could repair bone and replace teeth.  He had a mishap a couple of days ago.  While working on a ladder, he leaned one way, the ladder went the other and after the air conditioner effectively removed two of his front teeth on the way down, his right arm "broke" his fall, literally.  He will be laid up a while, recovering from both orthopedic and oral surgeries.  The lessons learned are many, not the least of which is remembering that that little sticker on the top of a ladder that reads, "NOT A STEP" it is really important to pay attention to. 

Everyone be safe when working outdoors in the Spring.  It only takes a moment to do things safely, and it may take weeks or months to heal up if you choose an unsafe method that you think is faster.  Sorry, Son, but you gave me a teachable moment....and you did photobomb my phone last week!  I love you!


Monday, March 21, 2016

Quail, a great backyard meat source


Our venture into raising quail has expanded more this week after hatching our first Brown and Golden Jumbo Coturnix quail.  These little buggers are absolutely amazing!  Papa has admonished me more than once for just sitting and staring at these little bumble bee sized, fuzzy balls of energy.  I've heard them described as fuzzy popcorn, and after hatching our first bevy, I see why!

I started with 83 eggs I purchased from a friend (despite visiting for over an hour, she could not get them to lay one more for an even 7 dozen!).  I was more excited to start the hatch than I was informed so I made some mistakes, but still have ended up with a moderately successful hatch.  I have learned many things in the process so as I start an incubator of Chukar Partridge eggs this week, I hope to avoid some of the previous mistakes.  I'll explain what I did, and what I SHOULD have done.

I purchased the special quail rails for my automatic egg turner since my schedule does not allow me to be at home for over 24 hours at a time.  On March 1st, I loaded them up, setting them neatly into the incubator with the large ended down....(I know, I know....I will get to this) and a small amount of water in the reservoir in the bottom.  I knew the incubation period was 18 days, so I marked the calendar for March 14th, 4 days before hatch, for "lock down". 

I had done some experimenting on my digital thermometer and discovered that it read a full 2 degrees higher than my thermometer/thermostats in the house, which read exactly the same, so I made an adjustment to all the thermometer to read 104 degrees. 

Since my current incubator is a still air, I have learned that the target temperature is 102 degrees, plus or minus a half a degree either way, rather than the standard 99.5 degrees that is usually discussed when setting up an air circulated incubator.  I had done some homework.  :)  Another source I had read had suggested that unlike chicken eggs, quail eggs did not need to have a higher humidity, hence adding the small amount of water.

Now, for what I SHOULD HAVE DONE!  I should have placed the eggs in the trays SMALL END DOWN.  I have learned that this is the case with ANY egg you plan to incubate in an automatic turner.  As the chick develops, it develops in the upper part of the egg, hence the need for the larger end to be upward, allowing for better growth and development and allowing the chick to more easily turn to the final position for breaking out of the shell when it is time.  I also should have filled the water reservoir and used the plugs in the top of incubator to manage and maintain the humidity level at 45 - 50% during the first 14 days, and increase it to 60 to 65% during the last three days of "lock down".  The increased humidity during these last three days prevents the membrane inside the egg from becoming dry and tough as the chicks begin to pip their way out.  If it becomes to tough, the poor little guys are stuck and "shrink wrapped" within the membrane and will suffocate and die.  I did learn this in time to up my humidity some, but still had some issues with a few being unable to break through the tough membrane. 


Let me take a moment to explain the "lock down" period, as I understand it.  If you are hand turning the eggs, you will need to so, 3-4 times per day during the initial incubation period.  This prevents the chicks from becoming stuck to the side, and encourages movement which prevents deformity in the embryo.  The "lock-down" period is the last four days prior to the anticipated hatch date.  The eggs are no longer turned, if hand turning.  If using an automatic turner, they are removed from the turner and laid out on the screen bottom of the incubator. 


With quail, it would have been a good idea if I had added a breathable mesh to the bottom, to prevent them catching their tiny feet in the screen.  I will do this in the future.  You can use something like the non-skid shelf liner, inexpensive and easy to find, cut to size.  You could also use plastic canvas grid from a local craft store. 


The next four days are the time the chicks spend doing their final development, getting into position and beginning to break through their shells to emerge into the incubator.  This is the first time I realized how long it can actually take from the initial pip to final emergence.  I was frequently over 24 hours from the time I first noticed the tiny protrusion of shell until the chicks actually broke out of their shells.  Patience is much needed during this time, and with the exception of adding or removing the plugs to maintain humidity, you should leave things alone....especially NOT OPENING the incubator for any reason.
The chicks will not all hatch at the same time.  Some may begin hatching on day 16 while the last may not emerge until day 20 or 21.  If the eggs are older than 7-10 days it may take extra days for them to hatch.  There is no rush to remove them, and remember your goal is to not open the incubator, because they have enough nutrients from the yolk sac that they have absorbed in the last few hours before hatching to last them up to 30 hours.  I left my first ones to hatch in the incubator for nearly 24 hours with no ill effects.  When you open the incubator the humidity will drop and hinder the ones that are still trying to emerge from the shells.  I ended up having to help the last 7 of mine....which TOTALLY NOT RECOMMENDED.  They had struggled for quite some time and the humidity had dropped to the point that the membrane was very tough.  I did ultimately break the membrane for them.  Again, this is not recommended and they may be detrimental to the chicks.  I was to the point that I was certain that they would die without help, so I had nothing to lose.  I  DID NOT REMOVE them from the shell, just opened the membrane that they were unable to do, and left them to their own devices.  It appeared that it was too late for one, but the other six still appear to be doing well.
While the chicks are hatching it is time to prepare the brooder box.  This area will need to be dry, free of drafts and have a source of light/heat that will keep it at 95 degrees.  You need to avoid shavings or sawdust initially, as these little critters may try to eat it and die.  I put paper toweling down or easy clean up.  I added some water in a very shallow dish (plastic lid) filled with marbles.  The marbles are not only attractive to the chicks, but they prevent the chicks from getting into the water and drowning.  I was told by someone who has raised several quail that, "they really aren't very smart!"  

Even though the gamebird starter feed is in small crumbles, these guys are so tiny, I ran a few cups through the blender to make a powdered feed for their first week.  Then I cut the bottom off a plastic container to make a short bowl for their feed. 


The quail chicks will remain in the small brooder box for a week or two, depending on the number and how quickly they grow.  Then they will be placed in a larger brooder until they are at least 4 weeks old.  Their environment should remain at 95 degrees for the first week, and can then be reduced by 5 degrees per week until they are 4 weeks old.  By this time, unless it is really cold, the heat source can be removed.  By the time they are in the larger brooder, they will be under a heat lamp that can be raised a bit each week to achieve the temperature reduction. 

Some of the Coturnix Quail are Brown and some are Gold.  We got a mixture, so we will be able to see which variety we like the best.  We will be keeping the largest for breeding and eating or selling the rest.  They grown and mature quickly reaching full growth and weight at 6 weeks and become viable adults producing fertile eggs beginning at 8 weeks of age.   As the birds age will create a habitat with some "cover" for them to enjoy and an area with dirt or ashes for dusting their feathers.  I look forward to providing updates as the project continues and they grow and develop into meat for the table. 

The video below is a quick peak at them running around in the brooder box.  They remind me of fuzzy bumble bees without the stingers!  Ignore the background conversation.  Papa and JD were discussing some of their projects and their day and didn't realize I was videoing and I wasn't paying attention to their conversation. :)
 
 On a side note, our Texas A & M quail are growing rapidly.  We need to clip their wings to prevent any escapees from flying away.  They continue to react quickly and will dash out the door at lightning speed when you are cleaning the cage, changing the water or feeding them.  So far, we have only had one casualty.  Unfortunately, one quick female was fast enough to get out the door on me, but was not fast enough to avoid the grip of our Mountain Feist's jaws when she hit the ground.  We were able to retrieve her and dress her for our freezer.

It is hard to believe that these birds were approximately the same size as the one I held in my hand at the beginning of this post, just 6 weeks ago.  They are now "full grown" and can be put in the freezer at any time.  We will wait to butcher until we can try to sex them, so that we have several breeding covey.   They should be laying fertile eggs within the next couple of weeks.  We will be hatching those to raise for meat as well.  We will also sell hatching eggs, hatched chicks and adult birds as well as frozen meat as extra supply allows.


Monday, March 14, 2016

Greenhouse Progress

The weather the last few weeks has been remarkably warm and spring-like.  While the weather is much enjoyed, it comes with some anxious anticipation.  The earlier Mother Natures brings on Spring-like weather the more worried I become that there will be that late frost that will snap, getting the peach and cherry blossoms among other blooming plants. 

Spring Fever is also harder to deal with as the Spring temperatures climb and the temptation to plant the garden gets strong, even though the mind knows that it is too early.  So until the weather is truly stable and warm enough to plant, we have been working on some projects and taking care of the babies that have arrived or been added.  We have never been known to quickly complete a project....and the greenhouse we started a year ago, had been placed out of the way as the summer got busier last year.  We decided now was the time to get it closer to reality.

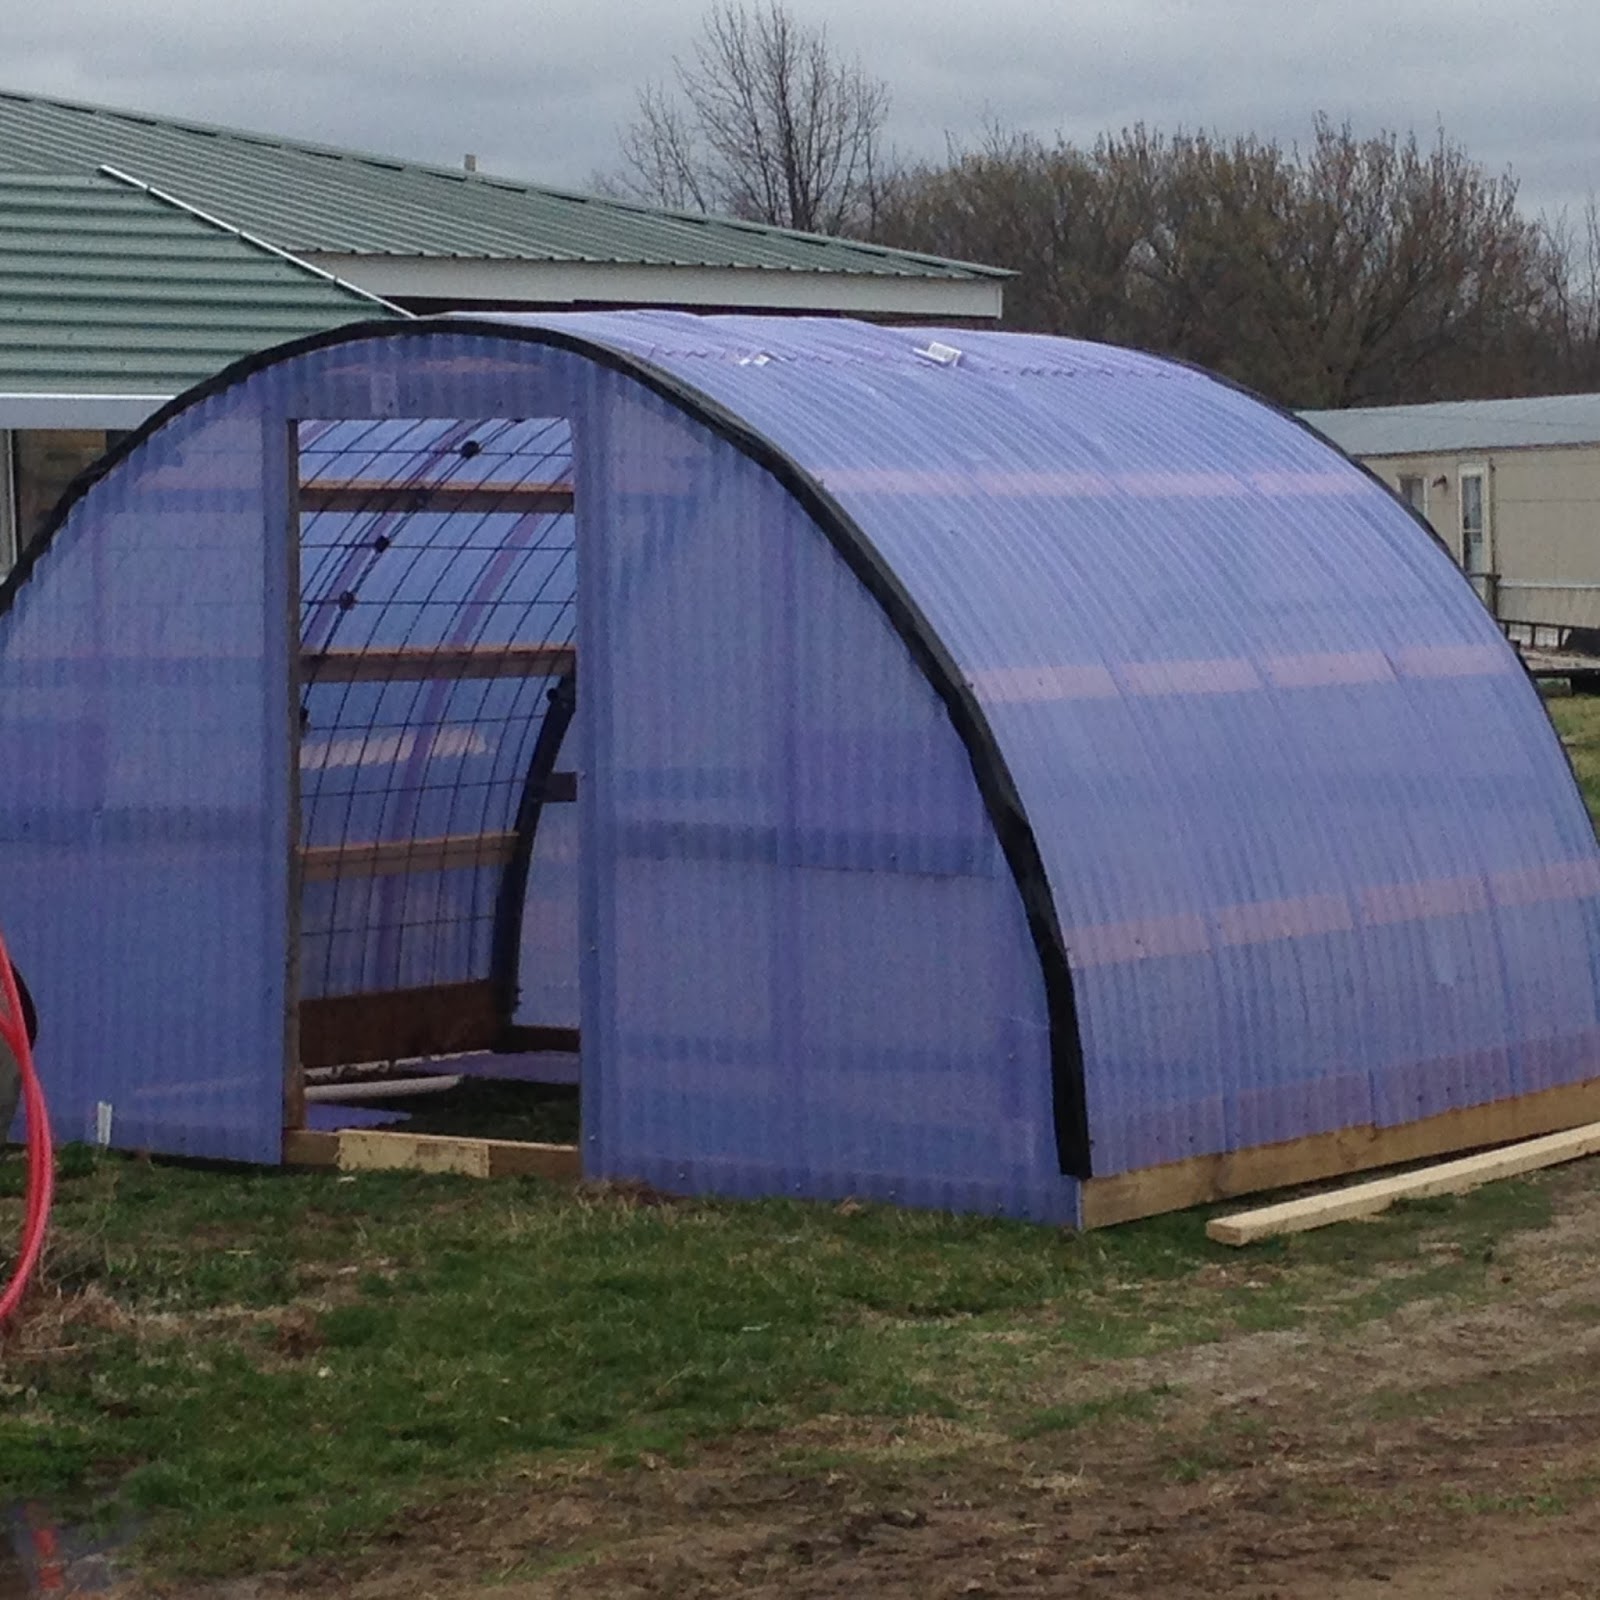
I am hoping to get the door on in time to start some plants for the garden, but if not, at least we are getting closer to being able to grow greens for salad all year long, by getting the green house closer to finished.  We opted to go for a corrugated PVC covering rather than plastic, for durability and longevity. 

We moved the frame to the location selected.  It is not far from the back door, close to a water hydrant and in full sun the bulk of the day. 

We began by attempting to attach the PVC sheeting horizontally.  We quickly realized that this plan would not work well, as there would not be enough tension to prevent them from being loose.  This would allow the wind to create movement that would eventually cause damage.


We removed the PVC pipes and drilled and screwed two by fours to the frames, evenly spaced to allow for adequate securing the corrugated PVC to the frame.  The corrugated sheets were then attached to the 2 x 4's with washered tin screws.  Papa and JD surprised me when I was at work one day and put the sheeting on, so I don't have pictures of that process.


Here is a nearly finished front.  We need to build and attach the door.  We also need to cut a window in the back that can be opened out for ventilation and to control the temperature in the summer time.  In addition to that, we will be making the raised beds and a table for starting seeds.  Hopefully this will be completed in the next couple of weeks.  We may not have time to get our own cool weather plants started, but we may still have time to start tomatoes, cucumbers, peppers, etc.  We are looking forward to putting this project to good use.  We have invested a bit more than we initially expected, but it should give us years of productivity, and spread over the last two years, the $400 we have invested has not hurt the budget too badly. 

 The learning process we will have will be enjoyable and at times frustrating.  I have recently learned that for each layer, we can gain a zone.  With that said, being in zone 6 (b), by having the greenhouse, we jump to zone 7.  If we add a hoop and plastic over the raised bed, it will increase to zone 8.  This idea becomes intriguing and I will be experimenting with a layer or two of plastic inside the greenhouse as we get further experience.  Until then, I am excited to be able to do more of our growing and seed starting without being dependent on purchasing them from franchise stores or local commercial greenhouses. 

Monday, February 29, 2016

Home Made Fabric Softener and Stain Remover


This recipe is so easy, I am almost ashamed to make it a post of its own.  Along with making my laundry soap for the past couple of years, I began making my own fabric softener.  I make if for pennies a load!  The only ingredients used are inexpensive hair conditioner (I usually pick up Suave because they make a couple of fragrances that I love), white vinegar and water! That's it! A gallon jug can be made for $2 or less and will last a very long time.  It can be added to the washer like the liquid made by the big companies.  

I hang my clothes on the clothes line on all but the rainy/snowy days and this formula works great.  I like to use the fragrances that are nature smells, Mountain Air, Spring Rain, etc, but you can use whichever fragrance you choose.  I show a bottle of coconut, because that is what I have on hand for my hair!  ;) I use a kitchen funnel and pour all ingredients into a plastic milk jug. The jug makes a great storage container and is great for pouring.  Using only 1/8 of a cup per regular load makes this go a long way.  I jug will last 3-4 months, easily.  I have little to no static cling, even in the winter with the extra dry air of wood heat.


Large Batch:                                                          Small  Batch:
3 Cups conditioner (22-24 ounce bottle)              1/3 Cups conditioner
4 1/2 Cups white vinegar                                      1/2 Cups white vinegar
9 Cups HOT water                                                1 Cup HOT water


There is nothing complicated about the recipe.  And it is just one more way I can save money and Do-It-Myself on this Modern Missouri Pioneer journey.  Next week I will show you how I use this fabric softener in the dryer, for those cold rainy/snowy days when I don't hang my clothes out to dry.

I've been asked about what I use for stains and tough farm dirt.  The above picture shows the bottle of stain remover I use.  The recipe is on the label.  Excuse the peeling label; this bottle gets used A LOT.  It is simply equal parts Dawn, Ammonia, and water.  I usually use one cup of each so that I get a good amount that fits easily into my quart spray bottle.  I buy the Dawn in the 5 gallon buckets for $35 from a local vendor ($0.22/cup).  Ammonia is $1.00 for a half gallon at my local Dollar General ($0.125 /cup). This makes a total cost of 34 1/2 cents  for a 24 ounce bottle!  Excellent cost per use.  Even with heavy use, I won't use more than 3 or 4 bottles in a year.  How well does it work?  The best example I could come up with while preparing for this post, was the collar of my uniform shirts.  They get very grimy and discolored.  If you are anywhere near my age, you might remember the old commercials regarding "ring around the collar" on the Whisk commercials....and that is exactly what I have...Ring Around the Collar! 


The inner collar and neckline of my inner and outer shirts soak up the skin oil and become very dark very quickly.  They look greasy.


I spray the effected area and scrub gently with a scrub brush.  The best results are found after allowing this to set for 12 to 24 hours after treatment, however, I am usually in a hurry and not organized enough to treat that far ahead.  The pictures below are how the collar areas came out by spraying, scrubbing, and dropping immediately into the washer with my home made laundry soap. 


Although not perfect, the improvement is obvious.  If you have a tough stain, retreat and rewash before placing in the dryer.  Remember heat will set a stain, so if you aren't happy with the results from ANY stain treatment, try something else BEFORE placing in the heat of the dryer for a better change of removal.

These two products do not allow us to avoid buying items at the store completely, but they do allow us to purchase basic items with multiple uses for much less than the finished products.  The part of my life as a Modern Missouri Pioneer that is to keep more money in my pocket that I spend at the store is satisfied with these types of products.  If you trying to avoid buying anything at any time, these products will not be for you, but if you are interested in continuing to utilize your modern appliances and dramatically cut the costs of doing so, these two items will help you do just that. 

Monday, February 22, 2016

Wash Day--making my own laundry detergent


One of the first overpriced items I stopped purchasing from the store was laundry soap.  I found several recipes and used a couple different ones that worked well, until I finally came up with the one I have been using for almost 2 years now.  It is simple to make, remains in powder form, so there is no melting, mixing, re-mixing or wait time for use.  It is a simple matter of measuring the ingredients and combining them with a grated bar of Fels Naptha or Zote soap, your preference or what is available in your area.  This is not the simplest recipe I found, but even though it has 5 different products it does a good job, along with my home made stain remover on even the dirtiest of our farm clothing.  I also use it on my work uniforms, and the navy blue pants do not fade nearly as quickly as with commercial laundry detergents.  The Zote soap is 3 x the weight and volume of the Fels Naptha for the same price, but I still use it in place of two pars of the Fels Naptha.  So here is my recipe.

1 Bar Zote Soap OR 2 bars Fels Naptha-grated
3 cups Borax
3 cups Washing Soda
3 cups Baking Soda
1 1/2 cups Oxygen cleaner (Oxyclean or store brand)


 The first step is to grate the soap into fine shreds.  This can be accomplished several different ways.  You can use an electric food processor with the grating blade, a hand grater or if you have one, a hand food slicer with the grating blade.  I found the one I have on Craigslist, dirt cheap.  It has different cones for thick slicing, thin slicing, French fry cutter, and grater.  This is invaluable in my kitchen.


After grating, add all ingredients to a large bowl and mix thoroughly with your hands.  This only takes a few minutes.


I then pour the mixed ingredients into a seal-able container and have a supply of laundry soap that will last Papa and I 6-8 months for under $8.00.  I know there are concerns regarding the use of Borax, so if you have those concerns, leave it out.  I find it is a great booster for deep cleaning the clothing and we have no issues, but for those who do, you will still have a great cleaning laundry soap.  Papa is actually very sensitive to may commercial detergents, but has had no issues at all since we switched over to using this.  Here is a cost breakdown of the ingredients:

Zote (2)                        1.94
Baking Soda                 2.24
Washing Soda              3.97
Borax                            3.97
Oxygen booster            3.86
Total for 2 batches   $15.98       (this will last us at least a year).

I like this process for many reasons, no the least of which is the ease of making it.  I work a full time job away from the farm, and it keeps me away at least 48 hours a week. Many weeks I am on the clock for 72 hours.  I need something that I can whip up in a hurry and not take all day doing it.  This fits the bill.  I am able to save many dollars over the course of a year, know the ingredients I am using on clothing that will touch our skin and still be able to fulfill my other work and family obligations.  This batch was whipped up in less than 15 minutes, and I have enough ingredients on had to make another batch.  This is the kind of DIY that allows me to be a Modern Missouri Pioneer and be grateful for the life we live. 


Monday, February 15, 2016

Birds of a Feather

The latest addition to our farm is a group of these little guys.  We have been talking about raising quail again, but hadn't decided when to do so. I had talked to a friend who will be having Jumbo Brown quail this summer about getting some eggs to hatch, but this little flock appears on Facebook and were an excellent deal, so we started now.  Funny how life will put things in front of you when you least expect it.  These 23 chicks were advertised as Texas A & M white quail, and Papa's previous experience with quail lead him to believe that they are truly the A & M.  This was the kind he was wanting, the price was right, so we made arrangements to purchase them.  They were eight days old when we picked them up yesterday and seem to be healthy and lively. 


Why would we want to raise quail?  There are actually many reasons.  The meat from quail is a very light, white meat and is quite delicious.  The eggs are considered by many to be a high end delicacy especially when boiled and pickled. The birds themselves mature rapidly and reach maturation and start laying eggs at approximately 8 weeks, and are ready for processing around 6 weeks.  This makes the time from birth to freezer one of the shortest of any meat animal.  The area needed for quail is small.  A nice pen or hutch could easily be placed in an urban yard.  There is no noise associated with them, so they are a good option for an urban homestead to raise some of the family meat supply, providing there are no zoning restrictions.  Papa and I are the only ones at home now, so many times a whole chicken is just too much for us.  We get tired of eating chicken before we get it all eaten. The smaller size of the quail makes them perfect for a single meal for the two of us. 

While there are many positive reasons for raising quail, I would be remiss if I didn't mention some of the negative aspects as well.  Each person should do their research and become familiar the requirements, pros and cons of raising any animal before making the decision to move forward and add it to their farm or homestead.  Some of the disadvantages to raising quail domestically are their broody habits, or lack of.  Quail are prolific egg layers, however they will seldom "go broody", set and hatch their own eggs. Unlike the Bob White quail that are native to Missouri, the Texas A&M and other Cortunix breeds seem to lack the natural instincts for setting and hatching.  The eggs will need to be incubated to hatch and replace the adult birds as they age.  While the size of the birds make them great for a meal for Papa and myself, if you have a large family you will need to take into account the small size of the birds when planning how many to raise and how much to place in a package together at processing time.  While most of these quail will not have the natural broody instincts they will have retained their natural flight instinct when startled, which can lead to broken necks when they are startled and hit the top of their cages.  They will need an area that free from sudden noise and other things that might startle the birds. They are also susceptible to drafts, cold and dampness, so their shelters need to have attention paid to those issues.  And finally, predators can be a problem, especially when the birds are kept in lightweight cages. 

Do your research, learn all you can and if you decide to start raising quail, I don't think you will be disappointed.  Let me show you how our birds will spend the next few days. 


Several years ago, Papa made our small brooder box to hold baby chicks in the first few hours after hatching before being moved to our larger brooder box in the barn.  It is a small lidded box that has a screen in the top for ventilation, a porcelain light fixture for a bulb for heat, and room for a small feeder and a small water dish. 


The light bulb is enough heat to keep them warm because of the small area and close proximity to the chicks.  The cord runs out the back and plugs into a standard outlet.  There is no switch to go bad, plugged in is on.  The lid lifts for easy access to clean bedding, refill feeders and add water.


These little guys did surprise me, and I quickly realized that much greater care needs to be taken when opening the box.  The flight instinct is strong even at 8 days.  I realized how high they could fly after two flew out and I had to pick them up off the floor before they disappeared under the couch.  We will leave them in this small brood box for 3 or 4 more days, so that we can keep a close eye on them.  They will then be moved to a larger brooder box, that is made similar, but has an area to hang a larger heat lamp and room for larger feeders.  They will also be able to be provided with more water.  They will eat and drink a remarkable amount over the next 4-6 weeks, considering their size.  When they are almost mature, and the weather warms a bit, they can be moved to a quail house and outdoor run. We will shut them up at night, even as adults to avoid attracting predators, which could include opossums, raccoons, foxes, coyotes, hawks and more. 

I'm not an expert in raising quail, though we have had some in the past and while they have some specific special care needs our job for these birds is the same as any of our other animals.  We must provide food, shelter, clean water and protection from elements and predators.  In return, they will provide us with food for the table.  Food that we know the ingredients and freshness of.  Just as the Pioneers of yesterday, provided sustenance for themselves and their families, we are also the providers for our family.  Yesterdays pioneers had many more difficulties to overcome.  As a modern Missouri Pioneer, I am glad to have the electricity to provide power for a heat lamps that will keep our birds warm.  I am glad to have running water and the choice of commercial feeds to make the care less labor intensive, but I am still proud to be able to provide farm raised meat for ourselves and our families.