In todays world, the desire to get back to basics is becoming more and more desirable. Our hope is that you will find some of the knowledge we share a benefit to you, to get closer to your dream of a healthier lifestyle, less dependent on assembly lined, processed, manufactured items.

Our goal is to help you find ways to use modern conveniences to allow you to live the life you want to live, and raise your family with the traditions that are important to you.

Grab a cup of coffee, or a glass of tea, and join us as we share our lives, our family and our knowledge with you.


Wednesday, March 30, 2016

A Week in the Life...


This previous week has been an ever changing series of events.  At times I've wanted to cry, occasionally I have laughed, and more frequently than my Mama would be proud of, I have cursed!  In dealing with a multitude of events, and trying to make sure we are caught up with the quickly approaching Spring, my blog post got put aside, twice.

Many people assume that living on a farm, or homestead, whichever you choose to call it, is a day to day life of serenity and sunshine, where you awake to the birds chirping, the sun shining and a day free of stress and obligation.  A part of that is sometimes true....occasionally....once in a while..... 

lA better description of the reality of my life is that I awake to the rooster crowing, goat kids screaming and/or an alarm blaring, the varied Missouri weather of 70 degrees one day and 30 the next, and a day that no matter how much you get done, you know more is waiting to be done.  The ever changing events of any given day can lead to frustration beyond belief.  Those are the days I realize that I need to learn to react to with a shrug and laughter, more often than anger and frustration.  Sometimes though, you just have one of those days.

We were actually making progress on the stands for barrels for planting in the green house.  We went to town and bought lumber, measured carefully and, after a couple of adjustments due to something that didn't cross our minds about how we were seating the half barrels, we ended up with some sturdy, waist high stands.  These stands will hold 4 half barrels that will be used for planting "salad" in the green house in the fall in hopes that we will have fresh grown greens and other salad fixings all winter long.  The plan will be to grow lettuce, spinach, kale, radishes, and onions, directly sown in the barrels.  I'm sure we will adjust our plans as we get further into the project. 


In the meantime, while we need to start seedlings for the summer garden, at least some of these barrels can be covered with a firm surface to create "tables" for our starter trays.  I cut some scrap plywood for that purpose, but I am getting a bit ahead of myself.  After finally completing the stands, I knew we were within minutes of getting my greenhouse to the point I could actually set a plant in it!  We hauled the stands to the greenhouse......only to find a minor problem.....


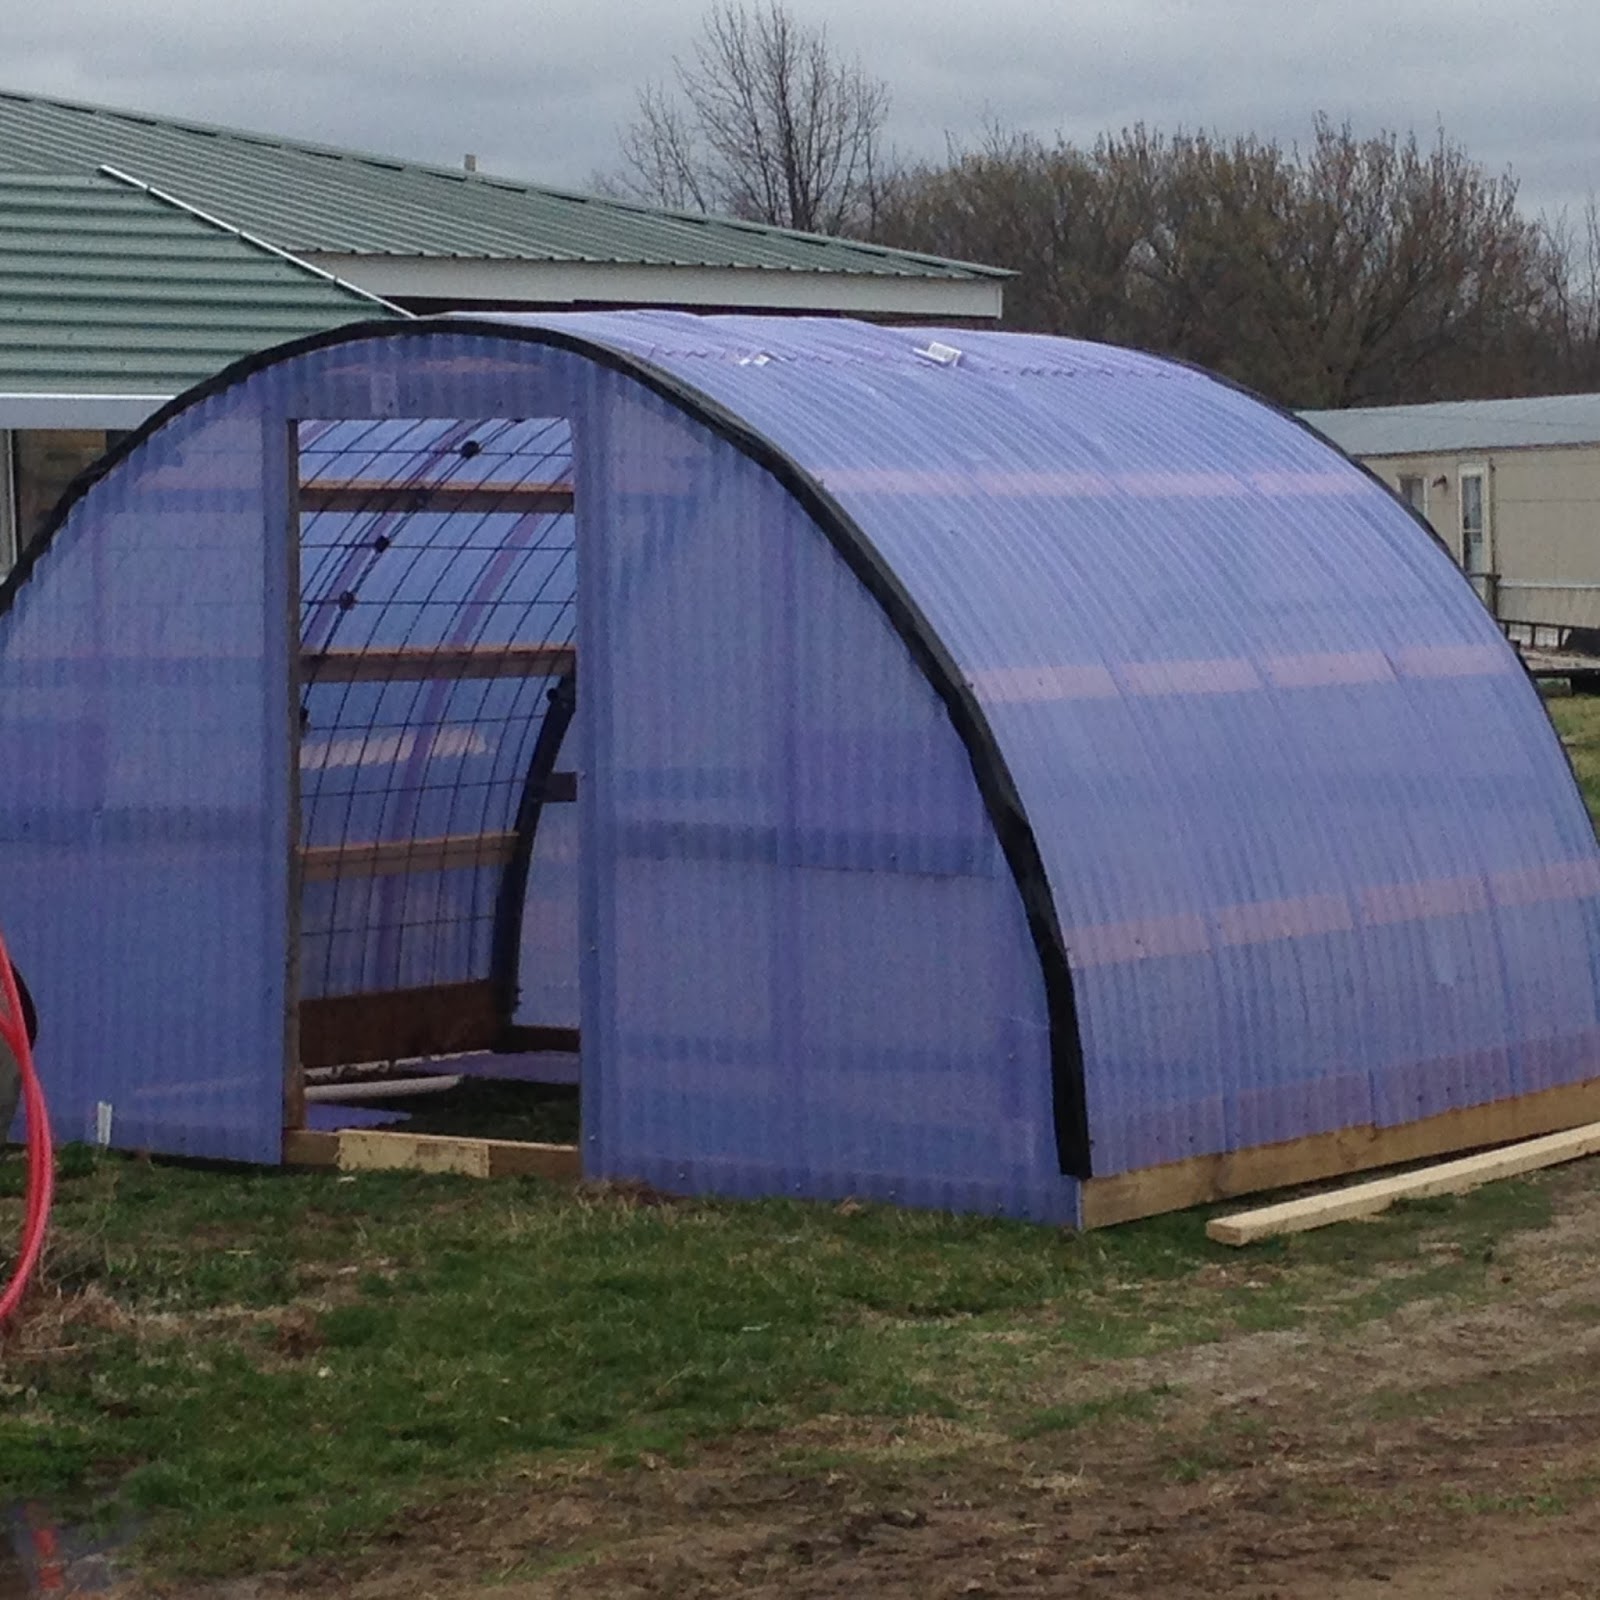
Though the greenhouse had withstood the high winds of spring on top of our hill for three weeks, for some reason it decided to succumb to the winds that day and go belly up!  We discovered it rocking back and forth on it's top.  It was amazing how quickly my demeanor flipped.  I went from feeling satisfaction and pride in knowing we were almost ready to add plants.....to wondering how in the world we were going to undo what Mother Nature had just accomplished. 

In looking back, I can laugh at how ridiculous my precious greenhouse looked, and can almost hear Mother Nature's witchy cackle as she reminded me that I needed to take the time to do things right.....like stake down the greenhouse!  Fortunately for us, we have a wonderful group of friends and a great family, so within a half hour of our frustrating discovery, we had help on the way, with a plan for up-righting the greenhouse and the rope it took to get it done.  I wish we had taken pictures of the process, because it actually turned out to be a very simple undertaking, that I couldn't see in my stressed out response.  We simply rocked it to one side, secured a rope to the bottom board, that was actually on the top, at the moment.  That rope was secured to the UTV and three of us guided and supported the greenhouse to it's proper position, while Papa pulled the rope with the UTV to pull it over. It's been 6 days since the greenhouse decided to do somersaults in the wind, and now is upright, staked down, door back on, barrels in place, plywood cut for tops of barrels, and a few plants started.  It feels and smells like a greenhouse.  It will have additions made to it, changes made to it, and further work done to it.  Just like life, it will be a constant work in progress.

Despite all the unforeseen issues, the past couple of weeks have allowed us to move the broilers to a large pen in the barn and make them a new feeder and waterer that will ensure they will have what they need to grow fast, and prevent many of the trips into the pen with feed and water.  We have moved the turkey poults to an outside pen, moved the quail to the large brooder box, butchered a pig to teach a friend who was uncertain how to butcher one himself, set the incubator full of Chukar eggs and officially check my digital thermometer for an accurate temperature reading, helped a friend milk out a Nannie goat with a sore udder, hung some shelves in the canning kitchen, had a short visit with my parents, and hosted Easter dinner complete with massive egg hunt. The nice days have been busy with outside activity and the rainy, cold days have been used to plan the outdoor projects that will be done when the sun shines again.

During my upside-down day, I realized a few things.  First of all, life is never still.  Life is a constant stream of changing events.  Our reactions to those events our what help to determine whether we are going to have good days or bad days.  I work on my reactions constantly, and while some think I am too laid back, others think I am too volatile and harsh.  I have high expectations.  But none of my expectations are any higher than the expectations I set for myself.  Rolling with the punches must be a developed skill to allow life to be enjoyed.  In addition to learning to roll with the punches, it has been critical for me to learn to understand the differences in Men and Women.

No, I have not just now discovered the physical differences in the sexes, but have focused on the psychological and emotional differences.  Do I respond well to those differences?.....nope....not usually, just ask Papa if there is any doubt.  I am still, at times, totally confused by these differences, but I am aware of them.  This awareness is the beginning of understanding and compromising. 

Let's take for a minute, laundry.  Ladies, did you know that most men DO NOT MIND dressing from the basket of clean clothing?  Really, they don't care!  Their clothing is available and clean.  Good enough for them!  Men, did you realize that there are women who find it important to fold and put away laundry after it is clean and dry, but also ORGANIZE their closets and drawers?  Yes, my clothing in my closet goes from white to cream to gray to black to brown to rust to red to pink......and each section goes from sleeveless to short sleeves to long sleeves to sweaters/jackets.  I can find what I want quickly, put together outfits that I feel good about wearing and quickly change from dirty jeans and boots to something clean and nice to run to town for feed.  And, yes, that is important to me.  I truly feel better about myself if I go to town free from the odor of pig or chicken shart. 

How about the perception of tools.....and their storage, or lack of.  Some men truly find it easier to return to the place where they last used them, and search for them than to have to open a tool box or cabinet to find them.  They actually usually know where they used it last, and are perfectly happy with the extra time it takes to do a project caused by the search for the elusive 1/2" box end wrench, that they used 4 weeks ago to replace the lawn mower blade.  The see no need to waste time organizing the screw drivers by size and design in a separate drawer from the wrenches arranged in size order.  They will be used and thrown in the last opened drawer, if they don't get left where they are.  On the same line, gentlemen, do not be surprised if your tender loving lady becomes a fire-breathing-rainbow-word-spewing-dragon.....when, even though they have bought you the fourth set of screwdrivers in less than that number of months.....they can not find one to complete a 2 minute job.   

Gentlemen, the view of watching your lovely farm woman use your best screwdriver, along with your new Eastwing hammer to chip away the large boulder that is preventing her from planting that new rose bush in the perfect spot, is about as pleasant to you as the feeling she gets when she finds Gramma Emma's antique bowl in the dog pen full of dog feed!
The author who wrote, "Men are from Mars, Women are from Venus" surely lived on a farm where two very intelligent people are trying to come to an agreement on the best plan to get the same result.  Or they lived in a home where the most important jobs of getting ready to have company for dinner have been strongly debated for eons. 

For the lady of the house, the importance of mowing the yard for the third time this week is definitely up for debate.  While the man of the house, sees no need to make sure the floors are swept for the second time today....after all, "those young 'uns are going to be running in and out all day anyway"....and who will know whether the stove was shiny and the counters were spotless, because they are soon going be covered with delicious food and no one will care.

Life has away of giving us balance, if we accept it.  It gives us ups and downs, it gives us sun and rain, it gives us cold and warmth, it gives us men and women, all of which are not only necessary to survive,  but useful to creating a life we enjoy and want to pass on to our children and grandchildren.  I recently had an impromptu Easter dinner at the house.  No one who came knew that my stove was not as clean as I wanted it, that both my washer and dryer were full of laundry in various stages of completion or that my bed was not made.  And apparently no one cared that my laundry basket was full of clean clothing waiting to be folded, nor did they care that there were cobwebs in the corners or that I didn't take time to change from my "chore clothes" to "company clothes". 
They did enjoy the food, loved being outside for a HUGE Easter Egg hunt, and visited and hooped and hollered throughout the afternoon.  The grandchildren will not have memories of a dinner where Nana was cranky and running them out from under foot, but will remember getting to sweep the floor (even though the corners were missed) without someone coming behind them making them feel like they weren't good enough.  They will remember getting to "stuff" the Easter eggs with candy with their Great Grandmother.  My 8 year old granddaughter will remember getting to peel potatoes for the first time (with a vegetable peeler).  My grandson will remember feeling the pride of putting the baby goat back in his pen, by himself, without being made to feel like he wasn't fast enough to do it himself.  These are the feelings I want everyone to feel when they are with us.  These feelings are only nurtured when you allow yourself the time and opportunity to truly and realistically set priorities and gain an understanding of the that are truly important to others.   
Spring is definitely a busy time, where every spare minute can be filled.  No matter what you get done, there is more waiting to do.  So I challenge you all to take a deep breath, smile at your family, and enjoy what you are doing.  If you are doing it just because it needs to be done, you are missing so much.


I mean really, who would want to miss a moment like this?  Welcome to my life! :)


Monday, March 21, 2016

Quail, a great backyard meat source


Our venture into raising quail has expanded more this week after hatching our first Brown and Golden Jumbo Coturnix quail.  These little buggers are absolutely amazing!  Papa has admonished me more than once for just sitting and staring at these little bumble bee sized, fuzzy balls of energy.  I've heard them described as fuzzy popcorn, and after hatching our first bevy, I see why!

I started with 83 eggs I purchased from a friend (despite visiting for over an hour, she could not get them to lay one more for an even 7 dozen!).  I was more excited to start the hatch than I was informed so I made some mistakes, but still have ended up with a moderately successful hatch.  I have learned many things in the process so as I start an incubator of Chukar Partridge eggs this week, I hope to avoid some of the previous mistakes.  I'll explain what I did, and what I SHOULD have done.

I purchased the special quail rails for my automatic egg turner since my schedule does not allow me to be at home for over 24 hours at a time.  On March 1st, I loaded them up, setting them neatly into the incubator with the large ended down....(I know, I know....I will get to this) and a small amount of water in the reservoir in the bottom.  I knew the incubation period was 18 days, so I marked the calendar for March 14th, 4 days before hatch, for "lock down". 

I had done some experimenting on my digital thermometer and discovered that it read a full 2 degrees higher than my thermometer/thermostats in the house, which read exactly the same, so I made an adjustment to all the thermometer to read 104 degrees. 

Since my current incubator is a still air, I have learned that the target temperature is 102 degrees, plus or minus a half a degree either way, rather than the standard 99.5 degrees that is usually discussed when setting up an air circulated incubator.  I had done some homework.  :)  Another source I had read had suggested that unlike chicken eggs, quail eggs did not need to have a higher humidity, hence adding the small amount of water.

Now, for what I SHOULD HAVE DONE!  I should have placed the eggs in the trays SMALL END DOWN.  I have learned that this is the case with ANY egg you plan to incubate in an automatic turner.  As the chick develops, it develops in the upper part of the egg, hence the need for the larger end to be upward, allowing for better growth and development and allowing the chick to more easily turn to the final position for breaking out of the shell when it is time.  I also should have filled the water reservoir and used the plugs in the top of incubator to manage and maintain the humidity level at 45 - 50% during the first 14 days, and increase it to 60 to 65% during the last three days of "lock down".  The increased humidity during these last three days prevents the membrane inside the egg from becoming dry and tough as the chicks begin to pip their way out.  If it becomes to tough, the poor little guys are stuck and "shrink wrapped" within the membrane and will suffocate and die.  I did learn this in time to up my humidity some, but still had some issues with a few being unable to break through the tough membrane. 


Let me take a moment to explain the "lock down" period, as I understand it.  If you are hand turning the eggs, you will need to so, 3-4 times per day during the initial incubation period.  This prevents the chicks from becoming stuck to the side, and encourages movement which prevents deformity in the embryo.  The "lock-down" period is the last four days prior to the anticipated hatch date.  The eggs are no longer turned, if hand turning.  If using an automatic turner, they are removed from the turner and laid out on the screen bottom of the incubator. 


With quail, it would have been a good idea if I had added a breathable mesh to the bottom, to prevent them catching their tiny feet in the screen.  I will do this in the future.  You can use something like the non-skid shelf liner, inexpensive and easy to find, cut to size.  You could also use plastic canvas grid from a local craft store. 


The next four days are the time the chicks spend doing their final development, getting into position and beginning to break through their shells to emerge into the incubator.  This is the first time I realized how long it can actually take from the initial pip to final emergence.  I was frequently over 24 hours from the time I first noticed the tiny protrusion of shell until the chicks actually broke out of their shells.  Patience is much needed during this time, and with the exception of adding or removing the plugs to maintain humidity, you should leave things alone....especially NOT OPENING the incubator for any reason.
The chicks will not all hatch at the same time.  Some may begin hatching on day 16 while the last may not emerge until day 20 or 21.  If the eggs are older than 7-10 days it may take extra days for them to hatch.  There is no rush to remove them, and remember your goal is to not open the incubator, because they have enough nutrients from the yolk sac that they have absorbed in the last few hours before hatching to last them up to 30 hours.  I left my first ones to hatch in the incubator for nearly 24 hours with no ill effects.  When you open the incubator the humidity will drop and hinder the ones that are still trying to emerge from the shells.  I ended up having to help the last 7 of mine....which TOTALLY NOT RECOMMENDED.  They had struggled for quite some time and the humidity had dropped to the point that the membrane was very tough.  I did ultimately break the membrane for them.  Again, this is not recommended and they may be detrimental to the chicks.  I was to the point that I was certain that they would die without help, so I had nothing to lose.  I  DID NOT REMOVE them from the shell, just opened the membrane that they were unable to do, and left them to their own devices.  It appeared that it was too late for one, but the other six still appear to be doing well.
While the chicks are hatching it is time to prepare the brooder box.  This area will need to be dry, free of drafts and have a source of light/heat that will keep it at 95 degrees.  You need to avoid shavings or sawdust initially, as these little critters may try to eat it and die.  I put paper toweling down or easy clean up.  I added some water in a very shallow dish (plastic lid) filled with marbles.  The marbles are not only attractive to the chicks, but they prevent the chicks from getting into the water and drowning.  I was told by someone who has raised several quail that, "they really aren't very smart!"  

Even though the gamebird starter feed is in small crumbles, these guys are so tiny, I ran a few cups through the blender to make a powdered feed for their first week.  Then I cut the bottom off a plastic container to make a short bowl for their feed. 


The quail chicks will remain in the small brooder box for a week or two, depending on the number and how quickly they grow.  Then they will be placed in a larger brooder until they are at least 4 weeks old.  Their environment should remain at 95 degrees for the first week, and can then be reduced by 5 degrees per week until they are 4 weeks old.  By this time, unless it is really cold, the heat source can be removed.  By the time they are in the larger brooder, they will be under a heat lamp that can be raised a bit each week to achieve the temperature reduction. 

Some of the Coturnix Quail are Brown and some are Gold.  We got a mixture, so we will be able to see which variety we like the best.  We will be keeping the largest for breeding and eating or selling the rest.  They grown and mature quickly reaching full growth and weight at 6 weeks and become viable adults producing fertile eggs beginning at 8 weeks of age.   As the birds age will create a habitat with some "cover" for them to enjoy and an area with dirt or ashes for dusting their feathers.  I look forward to providing updates as the project continues and they grow and develop into meat for the table. 

The video below is a quick peak at them running around in the brooder box.  They remind me of fuzzy bumble bees without the stingers!  Ignore the background conversation.  Papa and JD were discussing some of their projects and their day and didn't realize I was videoing and I wasn't paying attention to their conversation. :)
 
 On a side note, our Texas A & M quail are growing rapidly.  We need to clip their wings to prevent any escapees from flying away.  They continue to react quickly and will dash out the door at lightning speed when you are cleaning the cage, changing the water or feeding them.  So far, we have only had one casualty.  Unfortunately, one quick female was fast enough to get out the door on me, but was not fast enough to avoid the grip of our Mountain Feist's jaws when she hit the ground.  We were able to retrieve her and dress her for our freezer.

It is hard to believe that these birds were approximately the same size as the one I held in my hand at the beginning of this post, just 6 weeks ago.  They are now "full grown" and can be put in the freezer at any time.  We will wait to butcher until we can try to sex them, so that we have several breeding covey.   They should be laying fertile eggs within the next couple of weeks.  We will be hatching those to raise for meat as well.  We will also sell hatching eggs, hatched chicks and adult birds as well as frozen meat as extra supply allows.


Monday, March 14, 2016

Greenhouse Progress

The weather the last few weeks has been remarkably warm and spring-like.  While the weather is much enjoyed, it comes with some anxious anticipation.  The earlier Mother Natures brings on Spring-like weather the more worried I become that there will be that late frost that will snap, getting the peach and cherry blossoms among other blooming plants. 

Spring Fever is also harder to deal with as the Spring temperatures climb and the temptation to plant the garden gets strong, even though the mind knows that it is too early.  So until the weather is truly stable and warm enough to plant, we have been working on some projects and taking care of the babies that have arrived or been added.  We have never been known to quickly complete a project....and the greenhouse we started a year ago, had been placed out of the way as the summer got busier last year.  We decided now was the time to get it closer to reality.

I am hoping to get the door on in time to start some plants for the garden, but if not, at least we are getting closer to being able to grow greens for salad all year long, by getting the green house closer to finished.  We opted to go for a corrugated PVC covering rather than plastic, for durability and longevity. 

We moved the frame to the location selected.  It is not far from the back door, close to a water hydrant and in full sun the bulk of the day. 

We began by attempting to attach the PVC sheeting horizontally.  We quickly realized that this plan would not work well, as there would not be enough tension to prevent them from being loose.  This would allow the wind to create movement that would eventually cause damage.


We removed the PVC pipes and drilled and screwed two by fours to the frames, evenly spaced to allow for adequate securing the corrugated PVC to the frame.  The corrugated sheets were then attached to the 2 x 4's with washered tin screws.  Papa and JD surprised me when I was at work one day and put the sheeting on, so I don't have pictures of that process.


Here is a nearly finished front.  We need to build and attach the door.  We also need to cut a window in the back that can be opened out for ventilation and to control the temperature in the summer time.  In addition to that, we will be making the raised beds and a table for starting seeds.  Hopefully this will be completed in the next couple of weeks.  We may not have time to get our own cool weather plants started, but we may still have time to start tomatoes, cucumbers, peppers, etc.  We are looking forward to putting this project to good use.  We have invested a bit more than we initially expected, but it should give us years of productivity, and spread over the last two years, the $400 we have invested has not hurt the budget too badly. 

 The learning process we will have will be enjoyable and at times frustrating.  I have recently learned that for each layer, we can gain a zone.  With that said, being in zone 6 (b), by having the greenhouse, we jump to zone 7.  If we add a hoop and plastic over the raised bed, it will increase to zone 8.  This idea becomes intriguing and I will be experimenting with a layer or two of plastic inside the greenhouse as we get further experience.  Until then, I am excited to be able to do more of our growing and seed starting without being dependent on purchasing them from franchise stores or local commercial greenhouses. 

Monday, March 7, 2016

Home Made Fabric Softener in the Dryer


After trying several techniques, I have come up with the way that works for me to soften and prevent static cling on my clothing that ends up going through the dryer.  I much prefer to hang my clothing on the clothes line to dry naturally and at no cost.  There are those rainy days and those cold winter days when you can't hang them out.  For the times I have to use my propane dryer to dry the clothing, I wanted an inexpensive way to avoid static cling and soften the clothing.  I tried the wool dryer balls, balls of aluminum foil and other suggestions found on the internet and from friends but none of these ways gave me the results I wanted.  I set out to find a way to use my home made fabric softener in the dryer. 

I needed to find a way to make sure the clothing was exposed to the fabric softener without being stained by the actual liquid touching the fabrics.  I tried soaking wash cloths and this technique worked reasonably well, but it was very messy wringing out the wash cloth.  I ended up with more on my hands and the top of the dryer than ended up in the dryer.  I realized that a sponge would hold an adequate amount of the liquid softener without dripping.  So I now have a canister of softener soaked sponge strips ready to toss in the dryer.


The procedure is very simple.  I purchased cheap sponges at the dollar store and cut each one into three or four strips.  I used enough to fill a plastic canister, packed tightly.  I've probably got 8-12 sponges that I use.  I pack them into the canister tightly, pour 1/2 cup fabric softener, or the amount needed to soak the strips, over the top of the sponge strips.  You may have to flip the canister over to allows the excess liquid to run back into the strips.  After setting a half an hour or so, the strips will soak up the fabric softener and, when the canister is sealed, will remain moist until ready for use.


I use two strips per normal load in my home dryer.  Though the clothing does not have a strong linger scent from the fabric softener, it does have a soft feeling and very little, if any static cling.  I ran out of soaked strips a couple of weeks ago and had just a small load.  Due to the weather and company coming, I did not have the option of hanging outside and didn't want them hung around the house, so I tossed them in the dryer without the sponges.  I could tell a big difference when the clothing came out of the dryer.  My T-shirts were full of static and were more stiff than normal. 

This is yet another item that we no longer purchase from the store.  Considering I seldom dry clothing in the dryer in the Spring, Summer or Fall, which mean I only use my dryer in the Winter, I only have to make two or three batches during an entire year.  This is just one simple step in our Modern Missouri Pioneer journey. It may seem insignificant but it is the little things in life that add to one another make up the life that we live.